Product
How Kanban2go fulfills Zawinski’s Law
The user sends an email message and you have to get it and process it some how. How do you do that? Read more –
PUBLISHED ON
This customer blog post is written by Damon Cali. Damon is the owner of Ninth Yard, the makers of TrackJumper, a simple web-based bug tracking application. He is also the lead web developer for kanban2go.

Every program attempts to expand until it can read mail. Those programs which cannot so expand are replaced by ones which can.
Zawinski’s Law
I don’t know if that is true, but kanban2go took a step in that direction recently with the addition of an email-based feature. The one thing that becomes obvious right off the bat is that writing a web application that can receive email is tough. There are a lot of moving parts, some of which are major projects on their own.
The user sends an email message and you have to get it and process it some how. How do you do that? Do you want to maintain your own mail server? Must you set up mailboxes for all of your users? What about spam and deliverability? It’s enough to make a developer wonder if it’s worth it.
Finding an easier way for users to create tasks
These were the thoughts in my head when we created the kanban2go task box. First a little background. kanban2go is a task management app designed around the principles of kanban. Each user has one or more virtual kanban boards, on which there are several virtual “tasks”. You log in, click “Add Task” and you get a task on the board that you can edit, drag about and interact with.
We wanted to improve things by providing users a way to email tasks to their account, instead of having to log into the app. This is when my head started spinning, which is usually a good indicator that it’s time to see if someone else has solved the problem.
Good artists borrow. Great artists steal. In this case, pragmatic artists rent. Thankfully, Mailgun makes this whole process easy. I’m going to lay out in this post how we approached the problem in hopes that it will trigger some ideas for your own app. The code here is not exactly what we use - it’s a simplified version - but the differences have more to do with kanban2go than with Mailgun.
Step 1- Setting Up Your Domain
The first step (after signing up for Mailgun) is to create and configure your domain on Mailgun.
We chose to use taskbox.kanban2go.com. That way, a user can send a message to user_abc123@taskbox.kanban2go.com (for example) and have the message appear in the user’s task box in the form of a kanban2go task.
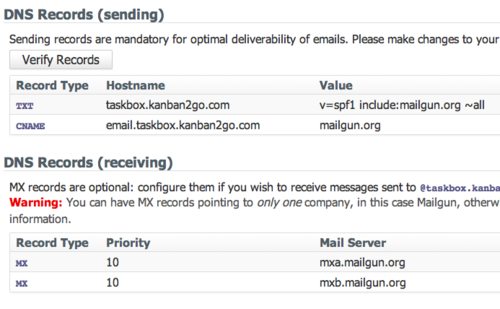
Domain configuration is entirely a matter of setting up the DNS records for your domain as directed by Mailgun and selecting the options you want on the control panel. Explicit instructions are in the Mailgun Control Panel for the DNS settings. Just follow them.
For the options, we chose to turn on the spam filter, blocking all incoming spam (you could also keep the spam, but we’ll keep things simple). Since we needed only one subdomain, we opted for a regular domain over a wildcard domain.
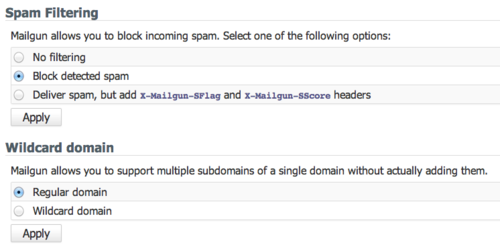
That’s it for domain configuration.
Step 2- Configuring Routes for email forwarding
Much of the simplicity of Mailgun comes from it’s routing system. You set up routes that tell Mailgun what to do with the messages it receives at the domain you have set up. In our case, it couldn’t be simpler - we wanted to have Mailgun forward all messages sent to *@taskbox.kanban2go.com to a URL in our app - http://kanban2go.com/mailgun/receive. The action at that URL will process the incoming message appropriately.
What’s great about Routes is that they support regular expressions and even named capture that passes through to the actions so they give you a ton of flexibility.
Routes are set up in the Routes Tab of the Mailgun control panel.
First we create a filter expression - which you can think of as a regular expression for Mailgun. In our case we want to match every message sent to our domain.
match_recipient('.*@taskbox.kanban2go.com')
Next we define an action that directs Mailgun as to what to do once it gets a match.
forward("http://kanban2go.com/mailgun/receive"), stop()
In this case, we are forwarding the message to our app, and then stopping.
Mailgun will parse the messages for you, providing some convenient features, or you can choose to receive the raw message. Since we’re not doing anything fancy and it saves us some work, we opted to receive the messages as parsed by Mailgun.
This is where a lot of the magic happens. When mailgun receives a matching message, it processes it and sends a POST request to the URL that is given in the Mailgun route. The parameters of that request include the sender, subject, body, and a bunch of other useful things. Check out the docs for more info on Routes.
Step 3- Receiving Mail With Rails
Now that we have Mailgun sending us POST requests, we need to set up our Rails app to handle them.
In kanban2go, a user has many tasks. Every task has an attribute named “content” that contains the text of the task.
In our Rails app, we need to handle the POST requests from Mailgun at http://kanban2go.com/mailgun/receive. The first step is to create a route for our new action in routes.rb.
post '/mailgun/receive' => 'mailgun#receive'
Next, we need to create a MailgunController with a “receive” action in mailgun_controller.rb
class MailgunController < ApplicationController
  protect_from_forgery :except => [:receive]

  def receive
    user = User.find_by_taskbox_address(params['recipient'])
    stripped_text = params['stripped-text']
    if user
      Task.create(:user => user, :content => stripped_text)
    end
    render :nothing => true
  end

end
Note that we must disable forgery protection for the receive action. For more information on how protect_from_forgery works, there is a great explanation in the Rails Security Guide.
The first thing to do in the receive action is to retrieve the user to whom the message was sent. In order to do this, we assign every user a unique task box email address (in a “taskbox_address” attribute) when that user is first created. For example, a taskbox_address might be “hard_to_guess74623@taskbox.kanban2go.com”. The important thing is that the address username must be unique and hard to guess. We then find the user with the User.find_by_taskbox_address method (it is sent by Mailgun as the ‘recipient’ param).
Next we pull the “stripped-text” param from the request. This is something that Mailgun provides when it parses an email message. The “stripped-text” is just the email body without any quoted parts or signature.
If we find a user, we create a task belonging to that user and set the content of that task to the stripped text. If we don’t find a user, nothing happens.
Step 4- Relax
And that’s it. That is all there is to turning email into tasks with Mailgun. Of course, this is a very simple example. Depending on your security and privacy needs, you may need to go through some additional checks and logic in your app, but the hard stuff is done for you at Mailgun - the routing, parsing, and spam filtering.
I hope this helps shed some light on why you no longer need to fear email in your app. There is a world of possibility - just get creative.
Are you thinking about building email handling into your app? Have thoughts about the approach outlined here? Post your thoughts in the blog comments or join the conversation over on HackerNews.
Full disclosure: kanban2go.com’s founder, Prabhakar Gopalan, works at Rackspace, the parent company of Mailgun. kanban2go.com predates Prabhakar’s work at Rackspace.
